How to convert VHS to DVD - Best Practices for Dummies (With Pictures)

While a VHS cassette might look like a mystery black box for a zoomer, if you were born pre-2000s, all of your TV-watching memories likely involve VHS tapes. In an attempt to preserve timeless classics or reminisce about family moments, you might be looking for a way to convert VHS to a more modern format: DVD. There are three different ways to complete the transfer. If you still own a VCR or are willing to buy one, you can either use a separate DVD recorder or a combined unit. Alternatively, there is an option to capture the video on your PC. Follow this guide for step-by-step instructions on each of the approaches.
Crib notes on VHS to DVD conversion
The analog-to-digital video conversion process ensures future compatibility of the material and technology and keeps your films from looking worse as the years go by. Still, it’s important to remember that a low-resolution VHS file won’t suddenly look HD-like on DVD. Before we dive into the nuances of introducing the content of your tapes in VHS to the digital age, a short overview of format definitions and development history is in order.
About VHS
In the 1970s, VHS tapes revolutionized the home video industry by making movies and TV shows available for regular users outside of the controlled schedule and repertoire of television. The tapes commonly had a two-hour recording capacity and used the helical scan technique to capture high-frequency signals on a magnetic VHS tape. If you study VHS footage today, you might notice stair-step effects and pixelation. That’s because back in the day, cameras and playback equipment were designed to handle interlaced videos - with two separate lines or fields recorded at two different points in time and merged together for the final shot.
About DVD
With the introduction of the DVD (digital video disk) format in late 1996, the VHS market started to decline. A DVD recording is created with a sharp-focused laser that works in the red-color spectrum wavelength. The readable surface of the disk represents a spiral track with a series of pits for binary values of 0’s and 1’s. DVD was able to offer higher footage and audio quality compared to VHS by providing enough capacity and processing speed. Among its pros were also a higher data lifespan and easier distribution due to compact size. Today, DVD uses updated technologies like HD DVD or Blu-ray.
Note:
While the transfer process from VHS might be a fun challenge that you are willing to take on, the easiest way to save VHS tape content is to find a dedicated conversion service. There are companies out there that specialize in turning analog videos into DVD and digital ones to help you save time, especially if you have a larger collection. Some of the nationally known chains in the US are YesVideo and iMemories. A simple Google search of ‘VHS to DVD services’ should also provide you with a few local businesses to choose from.
Do some research on the brands that come up: compare their pricing, equipment, reviews, and process organization. Don’t hesitate to ask questions: how long will the transfer take, can they work with copyrighted content, what will happen to your tapes? Since there is a slim chance of tarnishing the original medium, gather all the information you can to make a fully educated decision and protect your VHS videos.
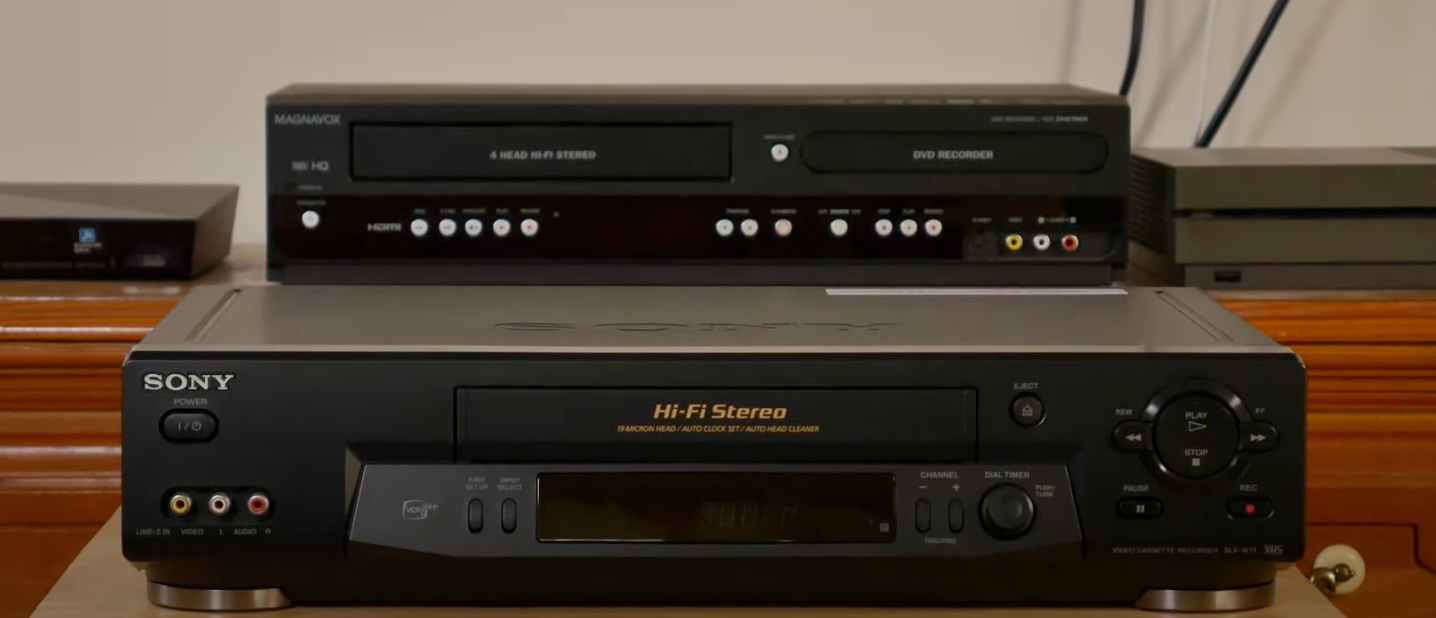
Use a DVD recorder
If you’ve chosen to take a hands-on approach without a PC involved, the first option would be to use two separate devices: a DVD recorder and a VCR to playback the VHS tape.
Tips on how to find a working VCR unless you already have one:
You can find a VCR at a local thrift shop or an electronic store like eBay for ~$10-$50.
Make sure it works before buying it: plug it in to see if it’s getting power and put in a tape to see whether the device will chew or spit the VHS out.
Try to find the remote that goes with the unit.
Buy a couple of VHS tapes of various quality to run tests on them before working with your actual footage.
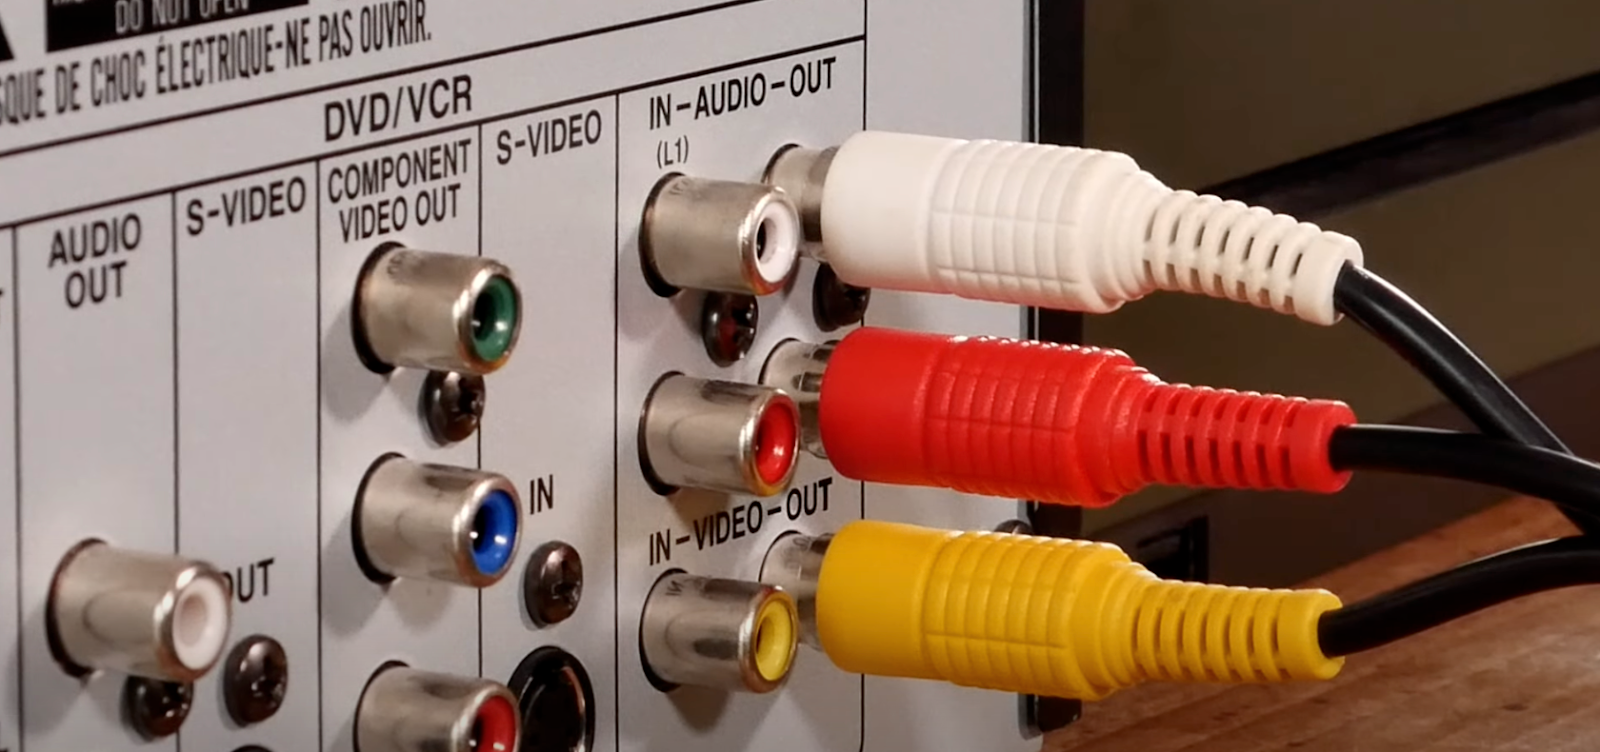
To get started, plug in your VCR, then run the yellow RCA composite video and red and white stereo audio cables from the output portion of the VCR to the input section of the DVD recorder. Input ports are usually located on the front of the unit while the output ones are more likely to be found on the back. Follow the color-coded scheme to insert the cables in the right places.
Warning: The RCA composite cables provided natively with most older player units can often come with shortcuts taken to reduce manufacturing costs and thus provide poor signal quality. To protect your tapes and ensure they turn out looking as good as possible, purchase reliable cables that have proper shielding to keep signal interference with other devices in your home to a minimum.
Now you need to tell the DVD which input channel to look for. If, for example, the cables are coming into Input 2, the same should be selected on the recorder. Assuming everything is working, you should see the video signal coming from the VCR playing through the recorder.
Once you have the duration mode you want to capture the VHS video in, insert a blank DVD into the drive. Let the disk load, hit the ‘Record’ button, and start up the tape. When you want to stop, press the corresponding button on the recorder or its remote, and allow the data to be burnt to the disk.
After the writing process is finished, you should be allowed to do some basic customization to the VHS and finalize the DVD.
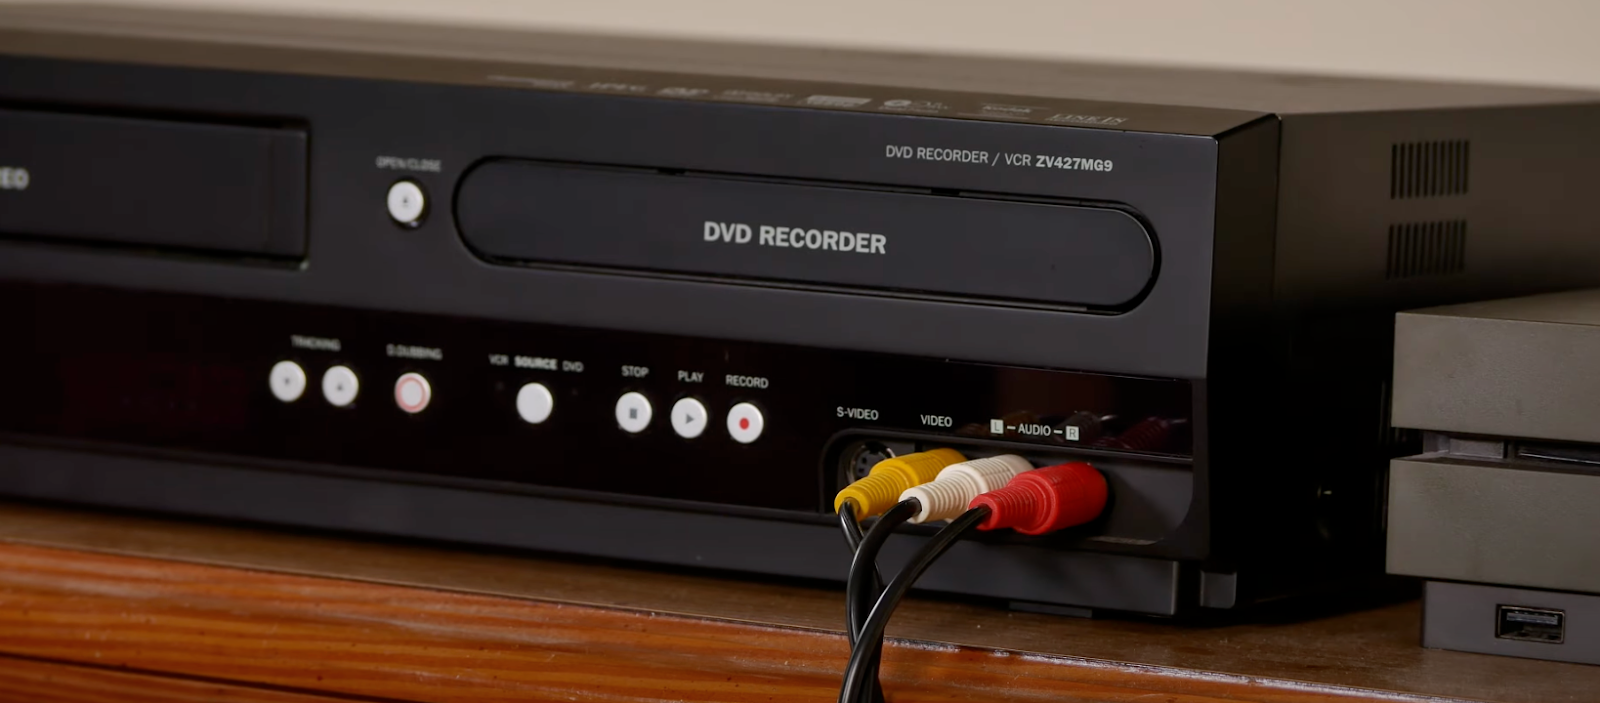
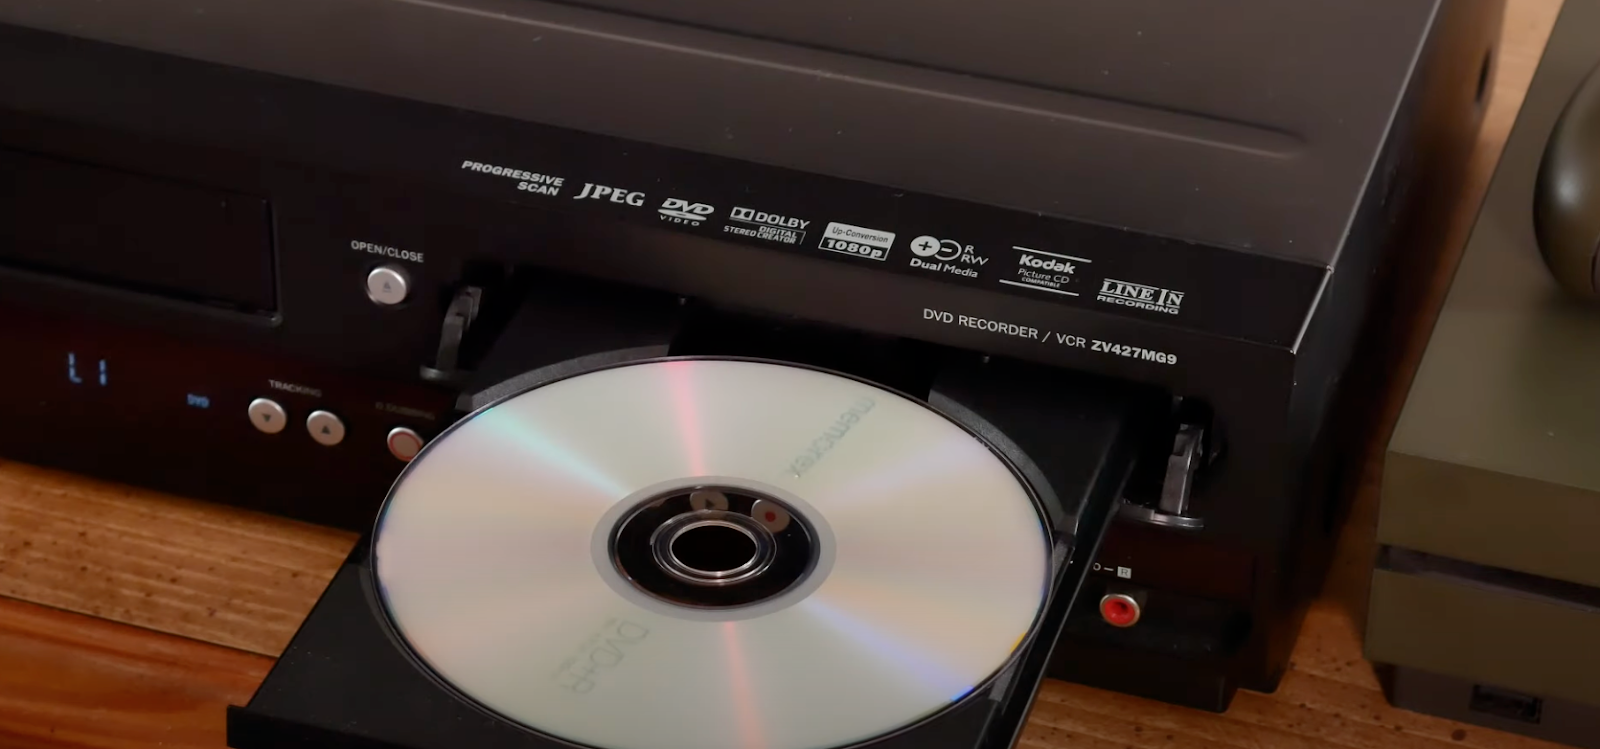
Use a DVD recorder/VCR combination unit
To kill two birds with one store, you could use a combo unit that has both a VCR and a DVD recorder. Unless you already have one, you can also find it at a thrift store or through digital advertisements.
Note: While each manufacturer's VCR - DVD recorder combo unit will vary a bit from one another, the general rules should be similar enough to fall along with most models.

Start by connecting the unit to your TV via analog ports using S-video or composite cables.
Insert a blank DVD in your recorder unit. Double-check to see whether there are any specific requirements for the disk. Unless there are, you should be fine with DVD-R, DVD-RW, or DVD+RW if for some reason you want to re-record over your dub footage.
Once the disk is inserted, the unit will begin loading it. After that’s complete, set the record mode: SP (2hr), SPP (2.5 hr), LP (3 hr), EP (4 hr), or SLP (6 hr). Keep in mind that the higher you go in length, the lower in quality your footage might end up looking. Unless you have less than an hour of the original video, it’s probably best to go with a two-hour increment since it is the standard recording period for tapes.
After you’ve selected the desired length of recording time, put your tape inside the VCR. Queue it up for when you want to begin and look for some kind of dubbing button to allow the unit to take over and start recording.
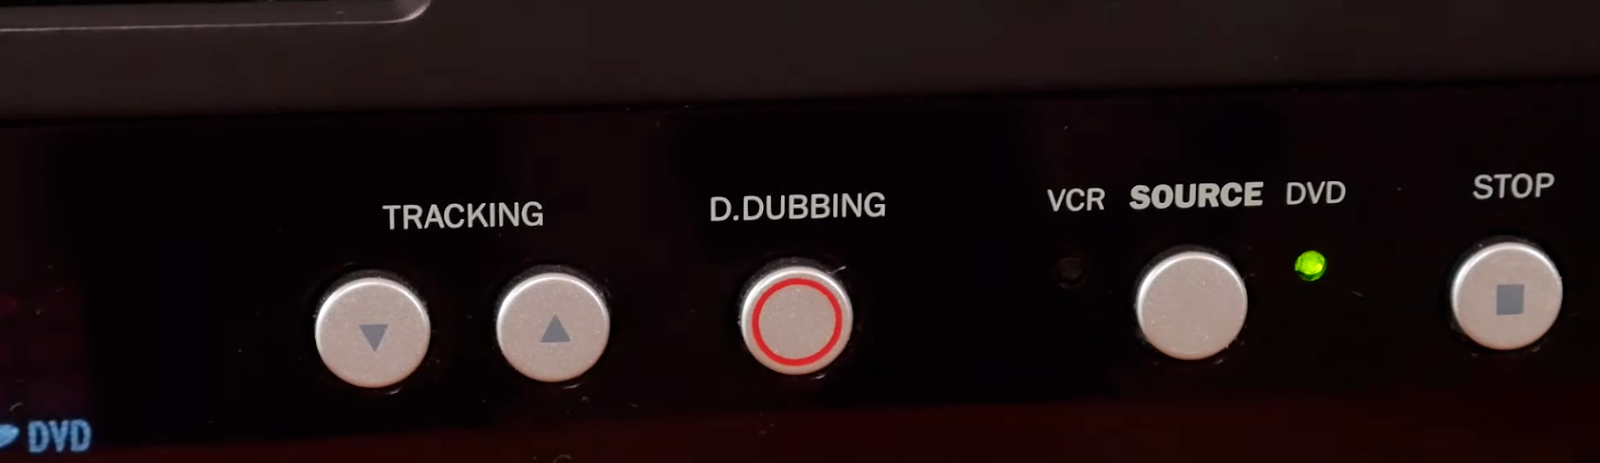
Tip: If you can’t locate the dubbing button, look for a manual for your combo unit online by searching for the particular model. In the guide, you should be able to find the right sequence to enter the dubbing mode.
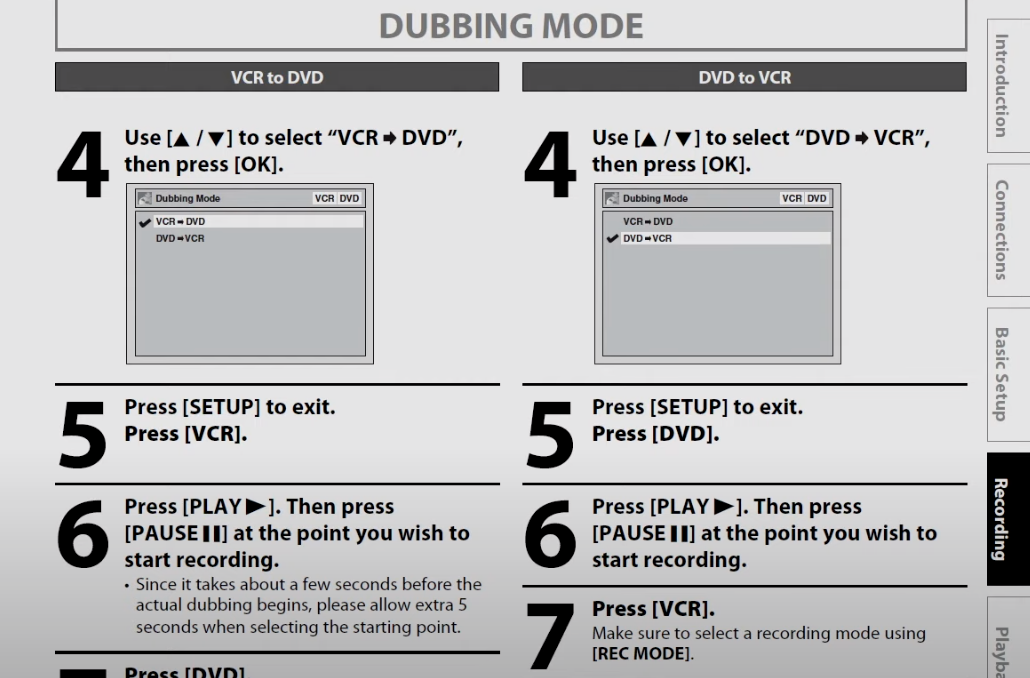
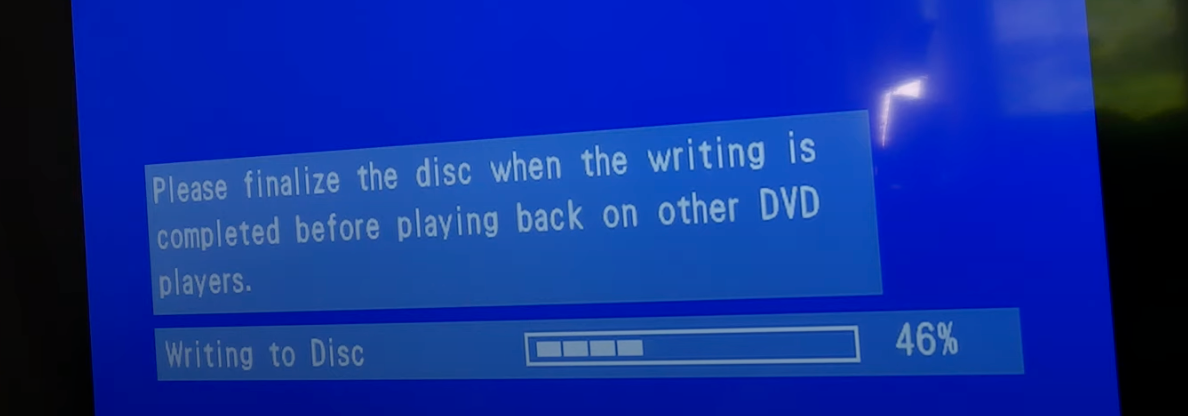
When the time you’ve allocated runs out, the unit will stop recording and will begin writing the data that has been collected from your tape to transfer it onto a DVD. Once that process is complete, you should be allowed to make small edits to the presentation of the content like naming the video or adding chapter marks.
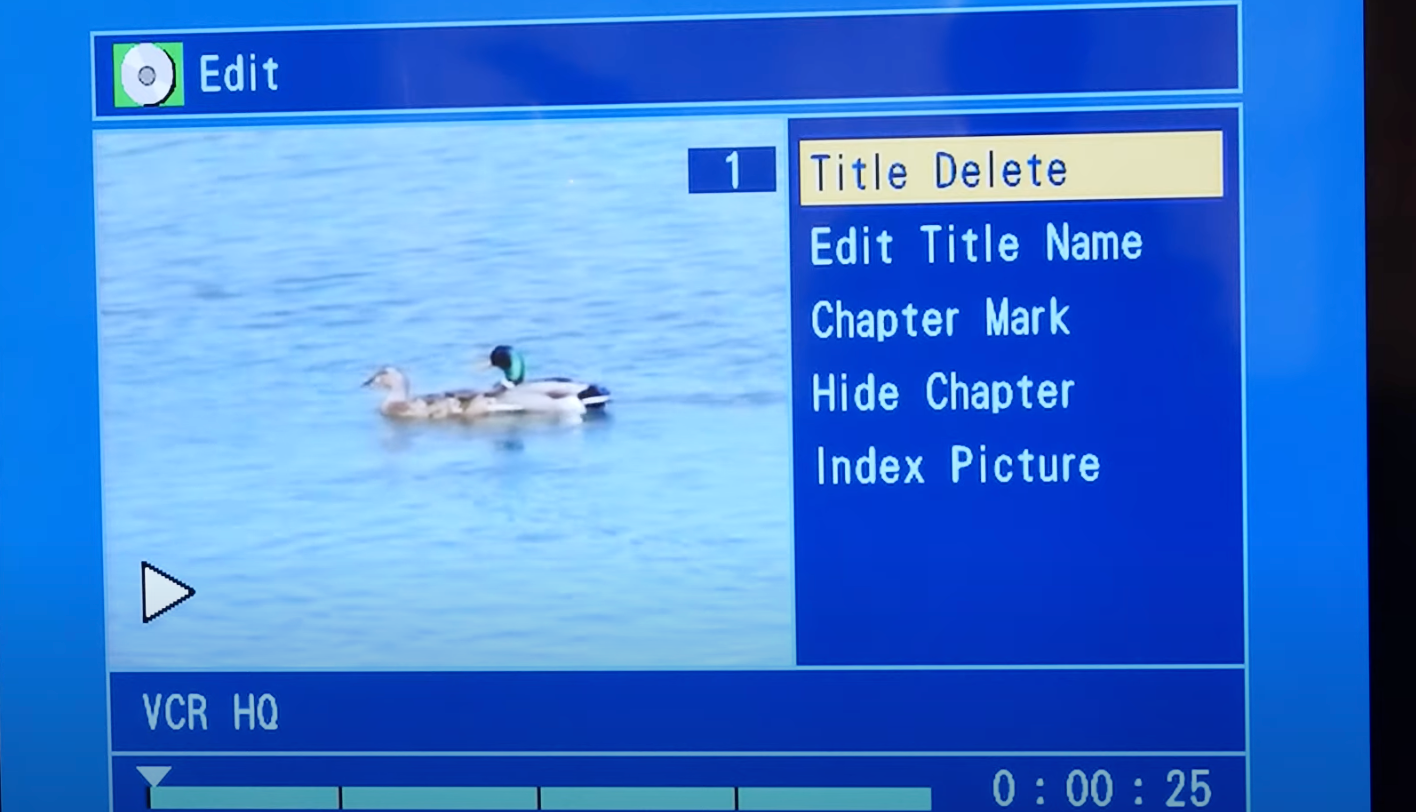
To finalize the work of the DVD writer, you need to prepare the disk for it to be successfully recognized by other players. Each recording unit will have its own way to set up the finalization procedure, so consult with the manual and navigate to the disk edit section.
Connect a VCR to a PC via a video capture device
To bring your old video tapes to the new age with the help of a PC, you can purchase an analog-to-digital video converter. These kinds of products are designed to allow your VCR to connect to your computer via USB through either standard composite or S-video cables. Along with the hardware, you will usually get an included DVD or website directions that contain the software needed to control the device.
Note: The following pictures will use Roxio hardware as an example. Depending on the program and manufacturer you use, the exact steps to follow might differ, but the general concept stays the same. Research different VHS-to-DVD converters to find the right one for your needs.
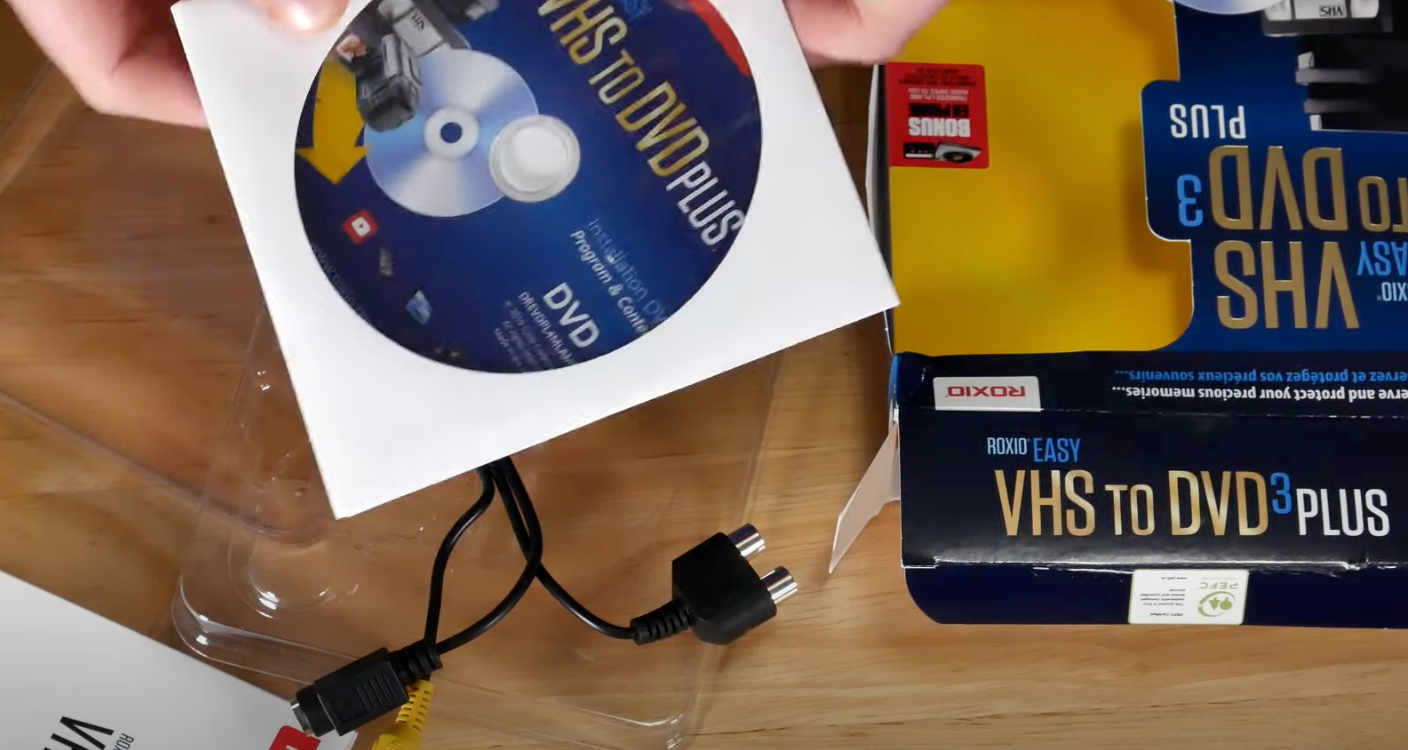
First, install the software. Read the license agreement and follow the instructions. Launch the program to start a new video capture project. Plug the device into the USB outlet and use the color-corresponding cables to connect it to your VCR.

Once everything is connected, you should see whichever image your VCR generates when a tape isn’t playing - generally, a static blue image. As for conversion options, you can choose to fade in and out from a black screen, normalize audio (to keep it at an even volume level), and select a location for file storage. Under the video name section, you will also be able to set the duration of the capture.
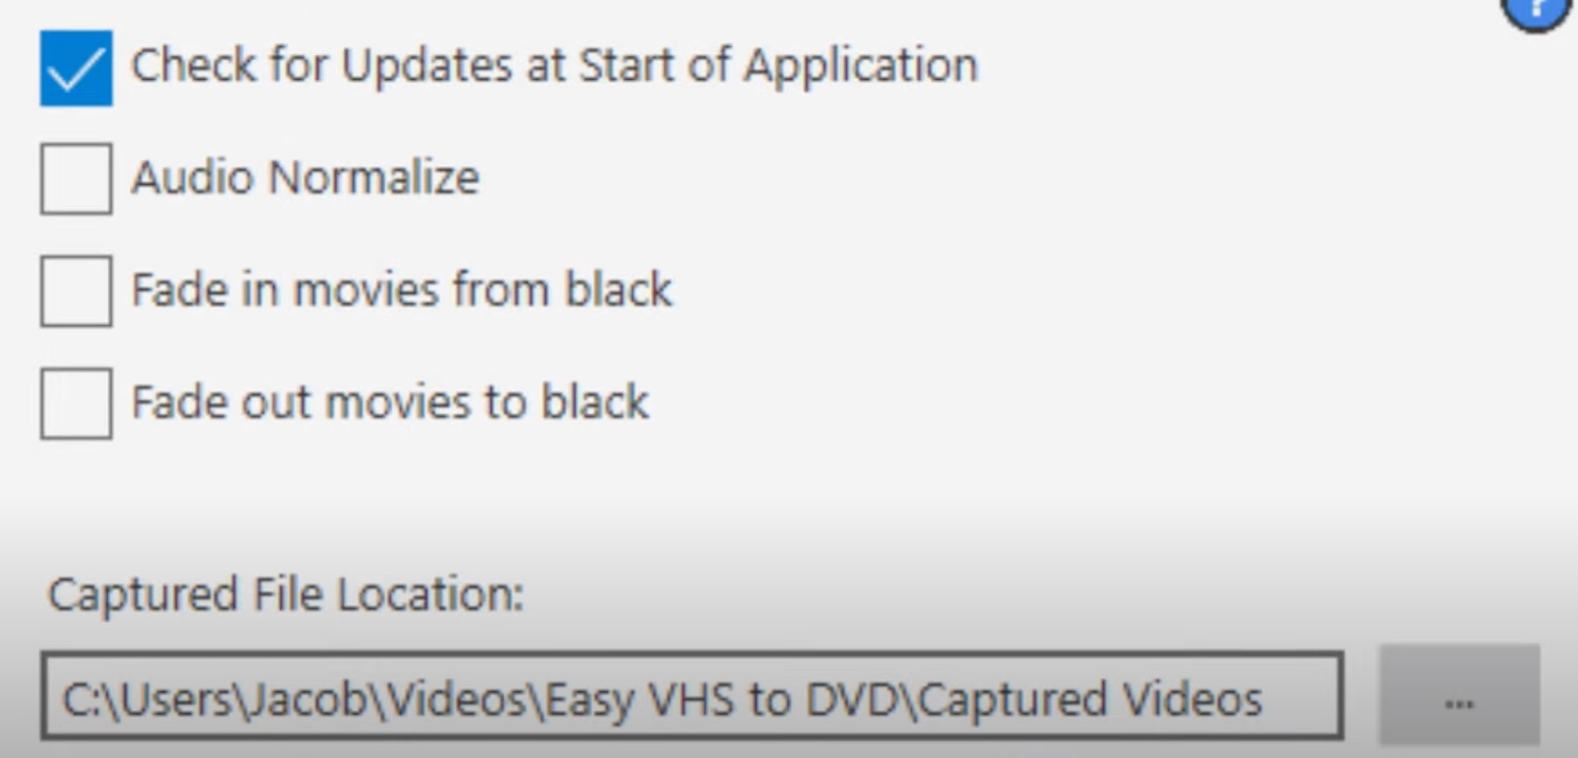
Tip: When choosing an aspect ratio, go with the 4:3 option. The often-suggested 16:9 will stretch the video and make the subjects you’re watching appear distorted.
With all the fields lined up, press ‘Play’ on your VCR. If you see your footage playing on the screen and a recording wheel circling in the software, everything is going the way it should.
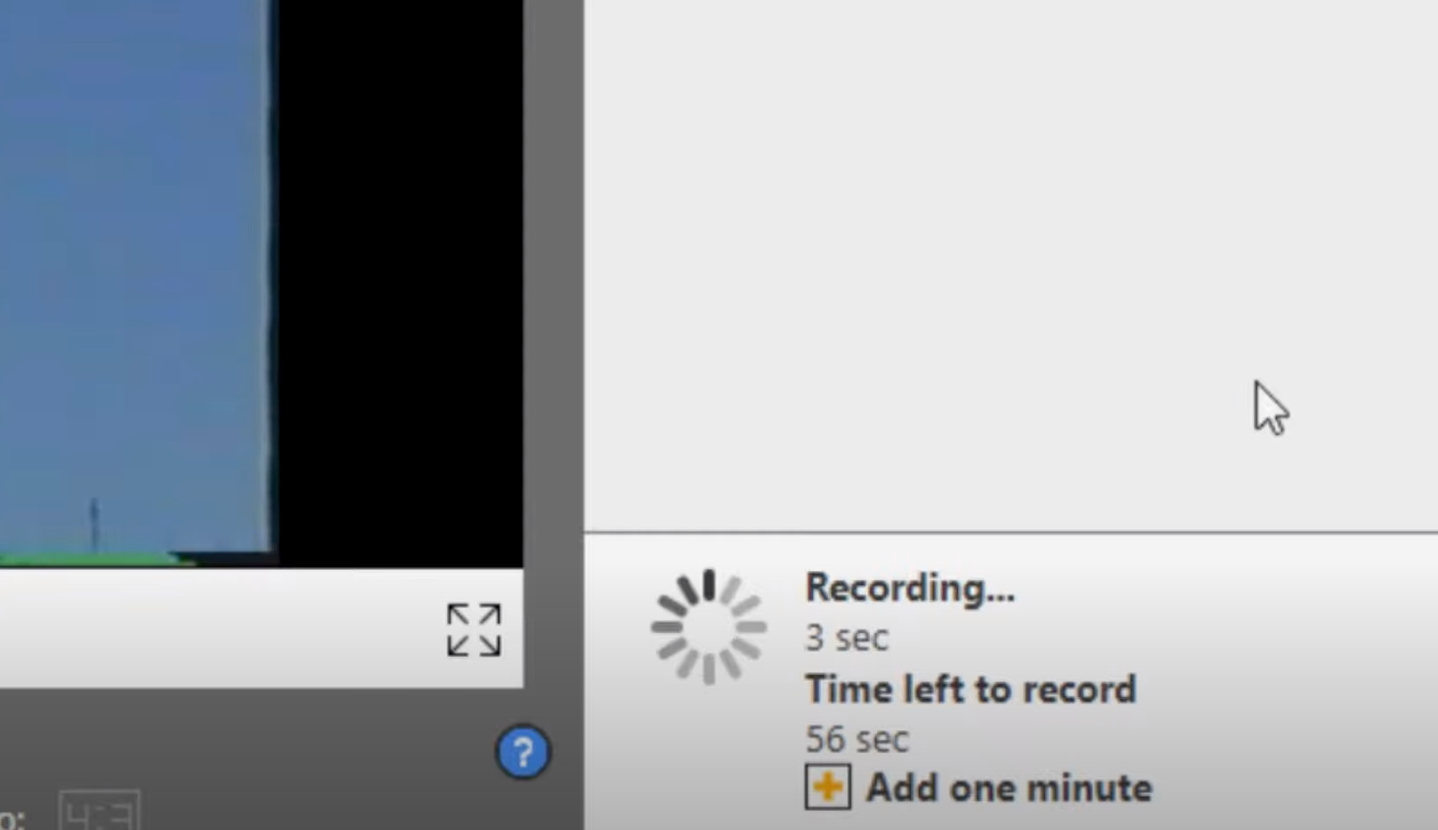
After the set duration time is up or after you press the ‘Stop recording’ button in the program, the device will stop capturing and you can begin reviewing and editing the footage.
Warning: Be careful with using too many video enhancement tools provided within the video capture device software. While they might hide some noise artifacts that pop up in VHS recordings, the trade-off is you will lose detail on what is already low-quality footage with little precision to begin with.
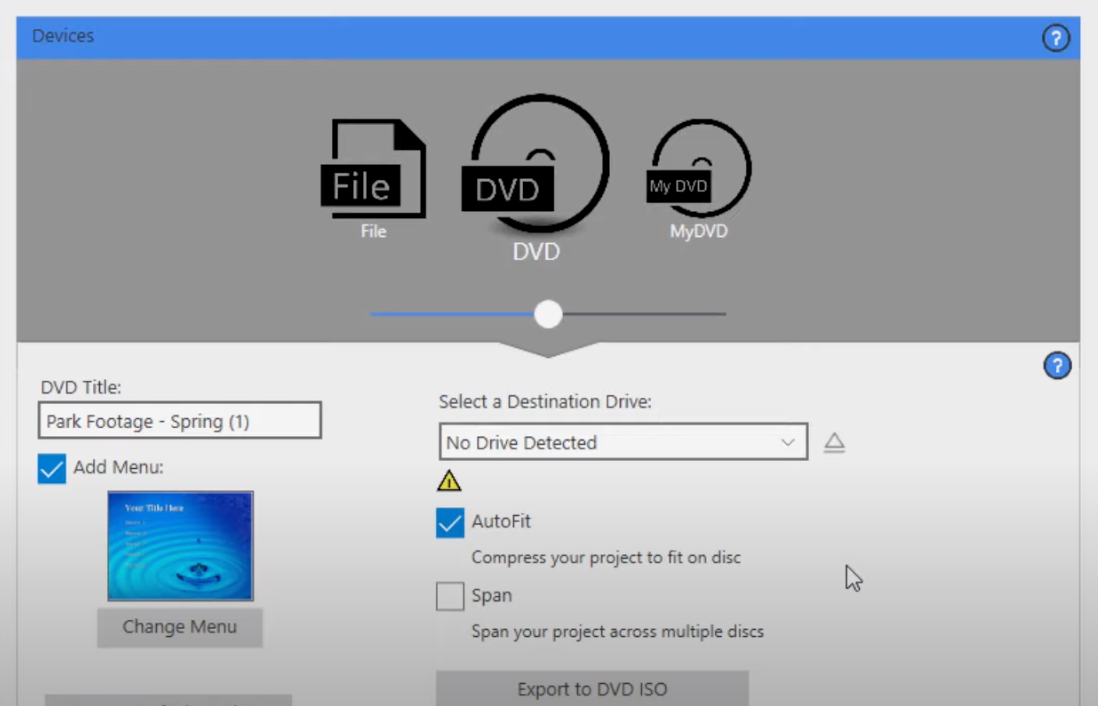
At the final output, you can either burn your footage to a DVD or export a digital video file.
Suggestions for MacBook users
Later-version computers that run on macOS usually have little-to-none cable and USB inputs. You would need to purchase an external hub to connect cables or a VHS capture device via USB 2.0.
The same goes for installing software from a DVD or burning the resulting video - MacBooks do not have a built-in DVD drive, so you would need to purchase an external one.
Apple is very picky as to what software can run on their computers. If you are purchasing a video capture device, make sure it will be compatible with macOS.
Summary: the easiest way to convert VHS to DVD
As the years go by, the chances that your VHS tapes will succumb to degradation increase. To safely store those precious moments and home movies on modern mediums, you should look into turning them into DVD videos. The easiest, yet most likely expensive way to convert VHS to DVD is to let a dedicated service do the work for you. Alternatively, you can use a DVD recorder, a DVD-VHS combination unit, or a video capture device with your PC at home. Once you have the DVDs on hand, you can further transfer them to backed-up digital files of other formats.